While playing with AI image generation recently, I ran into a frustrating problem: Why do other people's generated images look so much better than mine, even with the same idea?
I later realized the problem lies in the Prompt. The difference between a good Nano Banana Model Prompt and just a few random keywords is like the difference between a professional photographer and a casual snapshot—they seem similar, but are worlds apart.
Over the past month, I've spent a lot of time learning how to write good prompts, testing various tools and techniques. Today, I want to share some practical experience to help you avoid some common pitfalls.
Why Are Your Prompts Not Working Well?
At first, I was just writing whatever came to mind. For example, if I wanted the AI to turn a photo into a figurine, I'd just write "make it a toy." The resulting image... well, it was a toy, but it completely lacked the delicate feeling I was looking for.
Later, I discovered that a good Nano Banana Model Prompt requires three key elements:
- Specific Visual Details: Not just "turn into a figurine," but "a figurine in a packaging box, with a Blender modeling interface in the background, PVC material, indoor lighting."
- Clear Style Definition: Realistic style? Cartoon style? Q-version? These need to be clearly stated.
- Composition and Perspective: Top-down view, front view, side view—these details directly affect the final result.
Sounds complicated, right? I thought so too, until I found a great shortcut...
Say Goodbye to the Guessing Game: How the NanaVis Prompt Library Can Help You
To completely free you from "prompt anxiety," we've created an ever-expanding Nano Banana Prompt Library. It's not just a simple list, but a powerful starting point for your creativity.
1. Curated Categories for Instant Inspiration
We know your needs are diverse. That's why we've divided all prompts into four main categories:
- Portrait: Need a professional ID photo or want to turn an anime character into a realistic cosplay? It's all here.
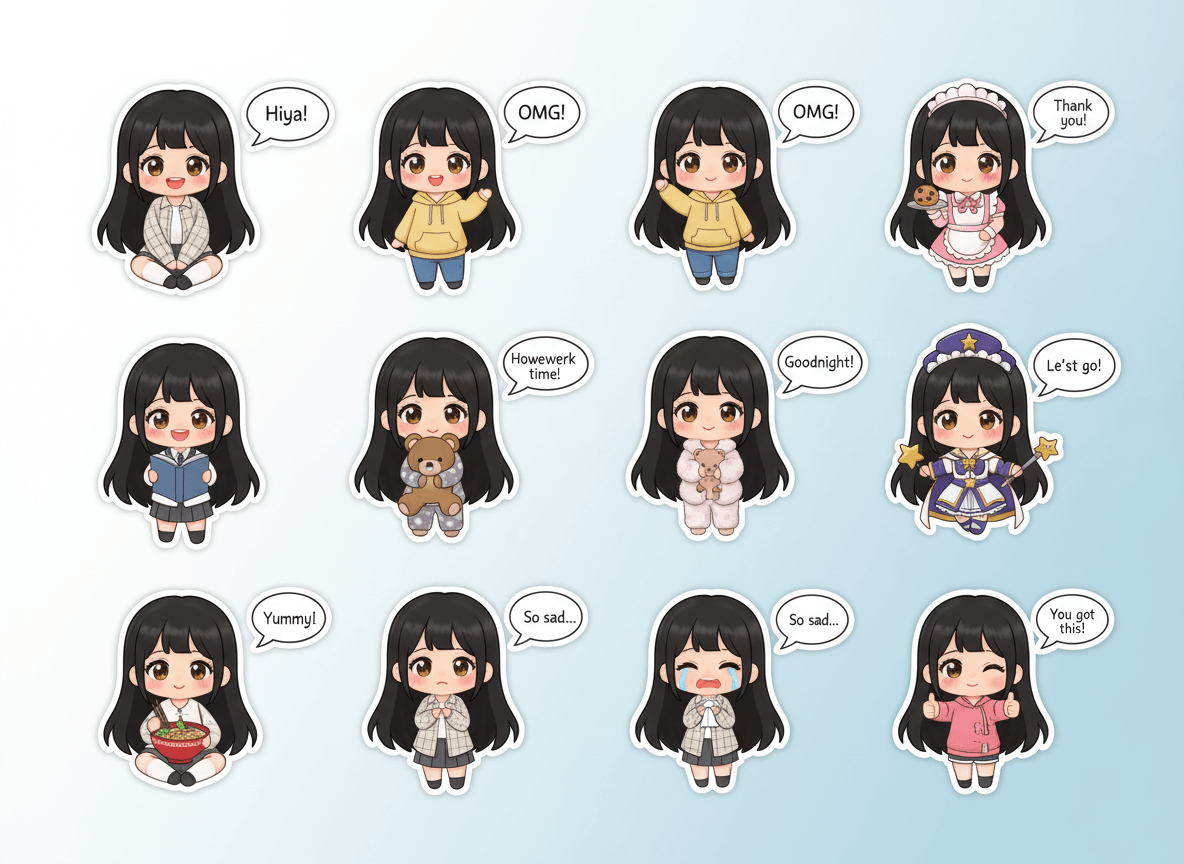
- Style: Want to turn a photo into a cute doll or create a set of Q-version chat stickers? Start exploring here.
- 3D Object: This is our star feature! Turn your photos, or even architectural designs, into exquisite 3D models with packaging in one click.
- Effect: From high-definition image restoration to generating creative recipe infographics, we meet your various functional needs.
2. "One-Click Use" - From Inspiration to Creation in a Single Step
See an effect you like? No need to copy and paste! Each prompt card has a prominent "Use Now" button below it. Click it, and you'll be taken directly to our Nano Banana Editor with the prompt already filled in for you. All you need to do is upload your image (if it's an image-to-image mode) and click generate.
3. "Before and After Comparison" - See the Effect at a Glance
For all "image-to-image" cases, we provide a comparison feature. Simply hover your mouse over the image (or tap on mobile) to switch between the generated image and the original. This gives you the most intuitive sense of the Nano Banana model's powerful transformation capabilities. For example, in this "anime character to real person" example, we show the original and the generated images:

Original Anime Character Image

Generated Realistic Cosplay Effect
4. Hot Trends - Stay on Top of What's Popular
Don't know what's trending? Our Prompt Library is sorted by the number of uses across the entire user base, so the most popular and effective prompts are always at the top. You can always stay up-to-date with the latest AI creation trends.
Hands-On Practice: 3 Cases to Get You Started with the Prompt Library
Theory is one thing, but practice is another. Let's use three specific examples to see how you can use our Prompt Library to create.
Case 1: Turn Your Friend into a Toy Figurine
- Goal: Surprise a friend by turning their photo into a realistic action figure.
- Steps:
- Go to the Prompt Library.
- Find the "Photo to Toy Figurine" card.
- Click "Use Now".
- In the editor, upload your friend's photo.
- Click "Generate," and in seconds, a beautifully packaged figurine with accessories will be created!
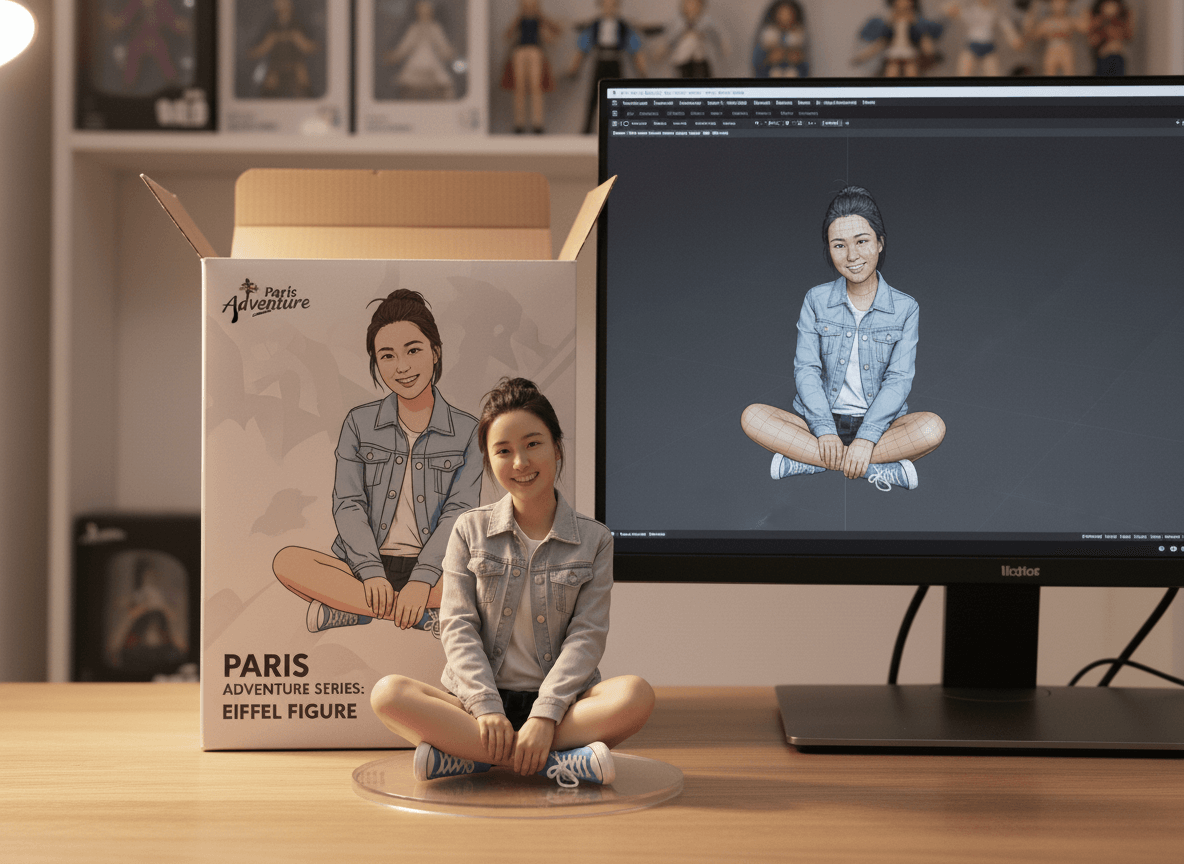
Prompt Used:
"Make an action figure of the person in the photo. Include the figure with accessories, such as clothing, shoes, and accessories. Also, write "NanaVis" on the top of the box. Please present this image in a realistic style."
Case 2: Create an Infographic for Your Food Blog
- Goal: Create a recipe infographic for Japanese chicken katsu curry for social media sharing.
- Steps:
- Find the "Recipe Infographic" card in the Prompt Library.
- This is a "text-to-image" case, so you don't need to upload an image.
- Click "Use Now".
- In the editor, you'll see the prompt is already in place. You can modify the ingredients and steps to fit your needs.
- Click "Generate," and a professional, clear recipe graphic is complete.
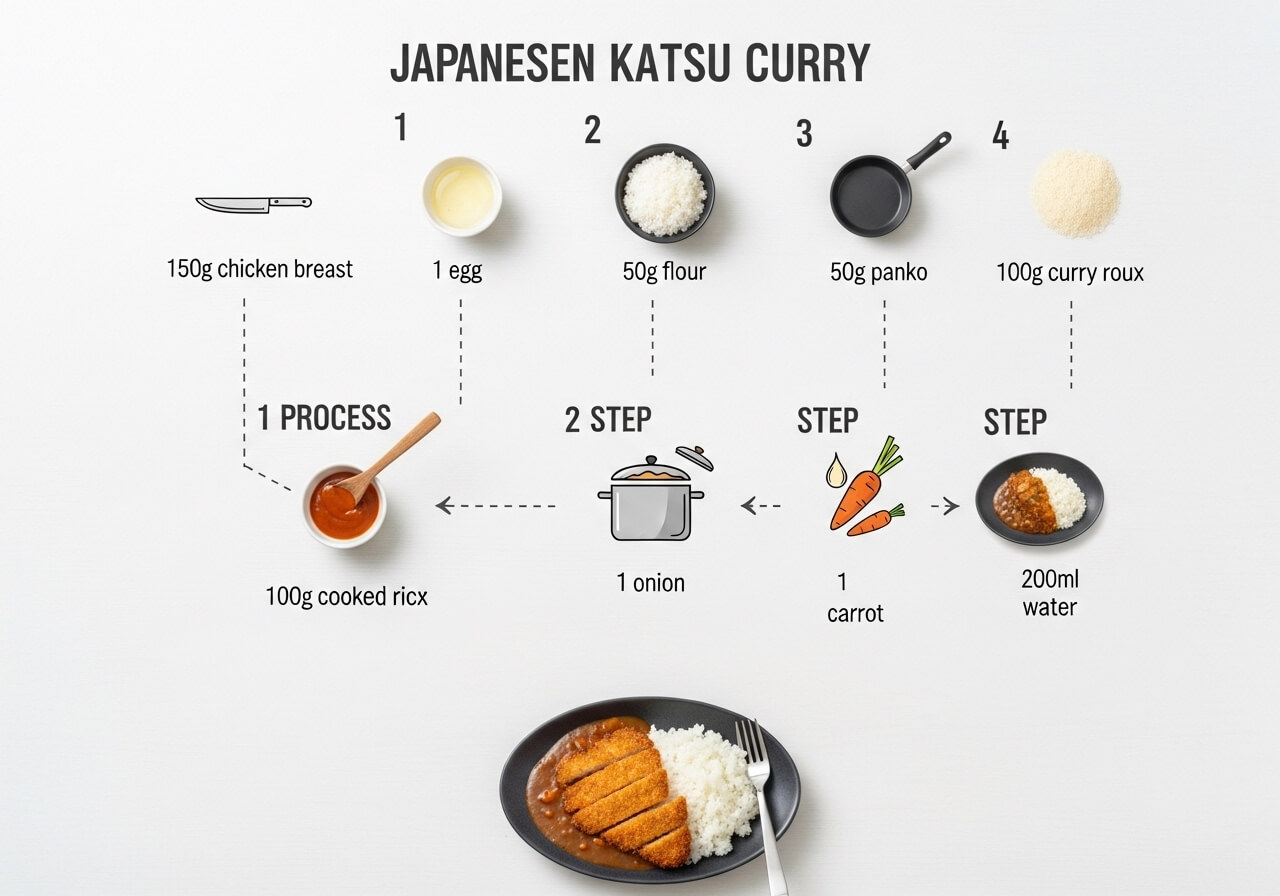
Prompt Used:
"Create step-by-step recipe infographic for Japanese chicken katsu curry, top-down view, minimal style on white background, ingredient photos labeled: "150g chicken breast", "1 egg", "50g flour", "50g panko", "200g cooked rice", "100g curry roux", "1 onion", "1 carrot", "200ml water", dotted lines showing process steps with icons (knife chopping, frying pan, boiling pot, plating), final plated curry rice shot at the bottom."
Case 3: Urgently Need a Professional ID Photo
- Goal: Need an ID photo at the last minute but don't have time to go to a photo booth.
- Steps:
- Find "ID Photo Generation" in the Prompt Library.
- Click "Use Now".
- Upload a well-lit, clear, front-facing casual photo.
- The AI will automatically change the background, adjust the clothing, and crop it to a standard ID photo size.

Prompt Used:
"Capture the head of a person in a photo and create a 2-inch ID photo for me. Requirements: 1. Blue background 2. Business attire 3. Full face 4. Smiling"
Some Tips and Tricks
After using it for a while, I've summarized a few tips:
1. Start with the Popular Ones
The prompts in the library are sorted by usage, so the ones at the top are the most proven. If you're a beginner, I recommend starting with the popular ones for a higher success rate.
2. The Comparison View is Important
Before using a prompt, check the comparison view (hover over the image to see the original) to see if your source material is suitable for that effect.
3. You Can Fine-Tune
Although the prompt is pre-filled when you click "Use Now," you can always modify it to your needs. For example, change "blue background" to "white background," or "smiling" to "serious."
4. Image-to-Image vs. Text-to-Image
Pay attention to which prompts require an image upload (image-to-image) and which don't (text-to-image). The recipe infographic is a pure text-to-image example; you can generate it directly.
Final Words
To be honest, I'm not a professional designer, and AI image generation is just a hobby for me. But this month of tinkering has taught me one thing: no matter how powerful a tool is, it's useless if you don't know how to use it well.
A good Nano Banana Model Prompt can boost your creative efficiency several times over. If you're also in the exploration phase, I highly recommend checking out these ready-made, high-quality examples. It will save you a lot of detours.
Of course, the most important thing is to experiment. Everyone's aesthetic and needs are different, and what works for others might not be your cup of tea. Try a few, find your own style, and that's what matters most.
P.S. The Prompt Library mentioned in the article is here: https://nanavis.com/nano-banana-prompt
If you have any useful prompts or tips, feel free to share them!